Cheese Makers Forum FAQ Equipment part 1 Equipment part 2 History

Thursday, October 29, 2009

Pizza Entirely From Scratch

I thought it would be fun to turn what is on the left here, into what is pictured to the right. What you see there is flour, salt, yeast, corn meal, basil, canned tomatoes from my garden, milk, rennet, citric acid, a thermometer, and a pH meter. This is the DNA of pizza, and the transformation of these humble items into a slightly charred, thin crust pizza is fun, rewarding, and damn tasty. Did I mention it's fun?

This is approaching 'from scratch' as much as is practical, but there are some changes I'll make in the future. The biggest one is raw milk--it tastes better and is easier to work with than homogenized, but you can still get great mozzarella from regular 2%.


Here we have 500 grams of flour and 13 grams of salt. I usually just tad more salt than traditional, but not so much as to make it salty after it is baked. A traditional recipe would probably have 10 grams, not 13, so it isn't a huge increase but it is there.


300 grams of water and 5 grams of yeast, which was set aside for ~10 minutes.


Hey look we have dough! Since I wasn't using really high protein flour like a real pizzeria would use, and it has a touch more water, it's a bit slacker and stickier than other dough. However, that ratio of flour to water tends to produce reliable, good tasting crusts, so in this regard I ignore tradition a tad :)


Prepping the ingredients for the cheese. On the left is the citric acid mixed with water, and on the right is liquid vegetable rennet diluted 20x.


And the pH of the mozzarella is correct at 5.2. Getting the pH right is the hardest part of mozzarella, since that was what makes it stretchable (sorry, no pics of that, my hands were full).


A small amount of dough spread thin over cornmeal with some roughly savaged basil. I hate it when the basil is on top--burnt basil does not taste good, nor does it look good when it is out of the oven. The cheese needs some browning, but basil does not.


And some chunky tomato sauce on top. They taste almost as good as they did when I picked them from the front yard. This pizza sauce is a bit special, since it is made from the fresh of the tomato, and the tomato water is emulsified with some good neutral oil (grapeseed in this case) and lemon juice. This gives the sauce a really big tomatoey flavor, a great mouth feel from the oil, but no gross oil slick on the final product since it is emulsified.


Some of that beautiful mozzarella on top of the tomato.


550F degree oven with all the fans blowing, on a slab of quartzite I stole from my mother-in-law.
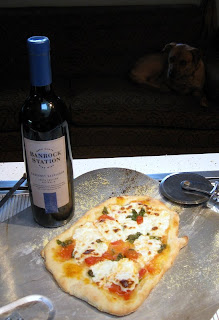
And I would call that lunch! A great home made pizza with a bit of cheap wine, and some very hungry looking canines.

Game: What Do These Ingredients Make?


Anyone know what these ingredients are going to be turned into?

Wednesday, October 28, 2009

Mozzarella!

I have tried several times before to make Mozzarella, but due to a lack of a pH meter they never worked out. For Mozz to work, it must be within a fairly tight pH range so it will become stretchy. So, when I upgraded the press (to the fabulous Pickett Press I finally broke down and purchased one.

That was a smart move on my part, since it let me correct some issues with the first big cheese wheel and also allow me to successfully make Mozz! As it turns out, I was getting some parts of the process to sour, which is why some of the cheeses turned out great and others really sucked.

Making Mozzarella is very similar to making other kinds of cheese, except unlike fermented cheese modern Mozzarella is made using an acidic component (in this case citric acid) to lower the pH of the curds. You can mail order citric acid, or many homebrew/wine making stores also carry it.

I used Ricki Carrol's 30 minute recipe with the microwave, and for a first success I'm happy with the results. It does look kinda funky since I wasn't exactly sure how to shape it, but it is absolutely string Mozzarella. I pushed out a lot of the whey so it won't be as creamy on a pizza as I could have made it, but the mechanical properties--the grain, so to say--are spot on. It's going to be fun trying different kinds of milk to see what results I get.


Tuesday, October 27, 2009

Pickett Press Pictures (aka the Big Press)

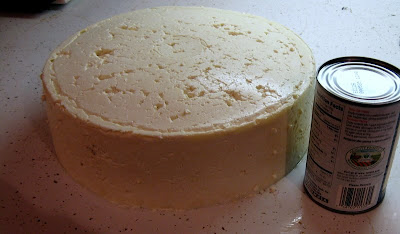
Here are some pictures of the new experimental press called the Pickett Press. For some background on why I constructed this and what problems it solves, check out this blog post. I just popped a loaf out of it this morning, and while there are some little modifications that need to be done it worked great. I didn't use cheesecloth so the surface of the loaf isn't that great looking, but mechanically it was *great*.


This is the follower. Not all of the ridges have been taken down--in fact I think it might be a fun exercise to see if I can press designs--so there is certainly a higher level of finish someone can do here. However all the really egregious protrusions have been removed.

The top was also sawed off. It is only pictured here so it is obvious that it was cut. You don't have to do this step necessarily, but with a ten gallon batch of the particular milk I used, it would have hit the edges of the handles and not gone any farther. If I was using raw milk, the batch would have been tall enough for that not to be a problem.


This is the big cheese mold, with 1/8" holes drilled in the sides. The holes on the bottom and lower side are a tad bigger since more whey gets expelled from them.


The mold inside the reinforcer. When you drill the holes keep both buckets together so the holes are placed at the same area. The reinforcer doesn't have any holes in the bottom drilled, just one 1" hole on the side near the bottom so whey can escape. Did I mention you should do your pressing in a sink or bath tub? Yeah, you should, especially if you like your carpet.


And here is what it looks like put together!

A few lessons learned.

First, I am going to drill a few very small holes in the follower, and also install some handles. There was quite a bit of suction this morning when I tried to remove it.

Second, I pressed with 80lbs, and that just isn't enough. Next round it will be doubled.

Third, the bottom of the mold did bow a little bit. Before I ratchet up the weight, I'm gonna think about some simple methods for reinforcing the bottom. It might be as easy as a small metal can sitting in the reinforcer and below the mold, but I don't know yet.

It isn't a pretty loaf of cheese, but I am sure once I get the technique down for handling these friggin' huge batches they will look better.

Monday, October 26, 2009

Brand new upgraded cheese press, $16 brand new

Well, invented is definitely a stretch here, but I've just come up with a system for pressing large batches of cheese--10-20 gallon batches--with a press that cost me $16 brand new. To put that in perspective, the first press I ever bought was a 1-3 gallon job, required constant tinkering, and cost $100. the one decent sized press at www.cheesemaking.com is $279 (!!!), but in all fairness it does look pretty.

The biggest problem when it comes to pressing cheese I have encountered has been stability--i.e. things tipping over. It seems most presses are proportionally too tall for the amount of pressure you need, and the 'follower', that is the piece on the top of the cheese that is doing the pressing, inevitably has quite loose tolerances and just makes the problem worse. There is really nothing more frustrating than having your weights thrown across the room because the follower became cockeyed.

What I hate about most spring-based or pneumatic-based presses really is the same issue, getting an uneven press. Personally I think a symmetric cheese with some whey-checks looks much better than a smooth lop sided cheese. Other people may have different opinions, but that is what I believe.

So, after pondering exactly what I wanted to accomplish--bigger cheese loaves, less hassle, minimal cost, it dawned on me how to make this all work together: tight fitting, food grade 5 gallon buckets, such as the ones you can buy from Home Depot for $3.90 each. Make sure they are food grade--they will say if they are, don't use them if they do not.

The idea is conceptually simple, but there are a couple of gotchas. The first is that your typical Home Depot plastic bucket, after you drill all the holes needed to let the whey escape, likely won't have enough structural integrity to hold the amount of weight needed during the press. The second issue is the follower should ideally be flat on the side that is pressing the cheese. The third is again weight related, the whole structure needs to ideally be able to support 200+ lbs.

So it turns out the execution is delightfully simple as well. For the cheese form, you don't just use a bucket--you use several buckets that tightly line each other. It's basically a food-grade-plastic laminate, with two or three buckets placed inside each other, and holes drilled through all the layers.

The second issue (a smooth follower) was also easy--take a hack saw the remove the lip and other offending pieces from the bottom of the bucket used as a follower. Along with some smoothing with a file and a little de-burring, this was pretty straightforward. Now unfortunately this makes the bottom of the follower a little weak, since material was removed. This could be a problem if there is too much weight and it pops the bottom of the bucket out, but there is a simple solution:

Another bucket.

It doesn't matter that this one has all the lips and what-not, since the force is going to be applied to the followers rim, not the bottom.

So, the cheese mold is made from two or three tight fitting buckets with appropriate holes drilled to let the whey drain. The follower is made from two buckets, one with a smooth-ish bottom, and one to hold the weights. I currently have a ten gallon loaf pressing right now, and it is stable as a rock. I don't know if I could knock it over if I tried.

Pics will be coming tomorrow after I brine the cheese loaf that is currently pressing.

And one last thing, the name. Since I haven't seen anyone else create this particular style of press before, I shall name it:

Monday, October 19, 2009

More mushrooms

We went out chanterelle picking again on Sunday and found quite a few more than last time, probably due to the increasing wet weather we've been having. We came back with some very large and quite tastey specimens, as well as winter chanterelles and a few cat's tongues. We also saw a coastal Giant Salamander who was pretty cool, some very tiny frogs, and a lot of stunning looking fungus.

The largest terrestrial salamander in North America. Neotenic larvae may grow to almost 14 inches (35 cm.) Large robust body with massive head, and stout limbs. Tail flattened from side to side. Dark brown to near black ground coloring above overlaid with light brown spotting or fine-grained marbling.


Thursday, October 15, 2009

Sausage Making

The last vacation Heather and I went on was to England and Scotland. It was a ton of fun and we had a great deal of astounding food, but one of the things that struck us was how damn good the sausages we have were. We were especially taken aback by Cumberland style sausages, which are rich, full flavored, not overly complex, and served as a coil instead of links. One of these monsters was a foot and a half long, and it tasted amazing!

So the first thing I did when we got home(well, not exactly the first, but you don't really need to know that, do you) was order a sausage stuffer and start doing some research. I've had British bangers before, but I never really thought about what made them different than other kinds of sausages. It turns out there is actually something fundamentally different, and that is the liberal addition of water/stock, and something called 'rusk'.

"What the hell is rusk?", I hear you muttering. Well, traditionally rusk is a breadcrumb made from unleavened bread. I am making a wild leap here, but I suspect it was from unleavened bread because it was cheap, and this was a meal for a poor person. I strive to do things traditionally and by-hand as much as I can, so in the spirit of tradition I baked several loaves of unleavened bread, let them dry out naturally, and ground them into crumbs went to Costco and bought the cheapest commercial breadcrumbs I could find.

Are you nuts, me doing that part by hand? Do you think a British peasant, if they had the chance, wouldn't go for the cheaper route--in this case Costco? Of course they would.

The recipe is quite simple. Seasoned pork shoulder is ground at as close to ice cold without being frozen as possible through a small die, mixed with rusk and chicken stock, then stuffed into (hopefully the same) pigs intestines. Tie or twist carefully, cook gently, and enjoy one of the greatest culinary treats in the world. This link here has a solid recipe and explanation of how to make a solid master recipe for bangers and Cumberland style sausage.

This sausage contains 'Rusk' - a toasted wheat bread crumb. This modifies the texture and the taste making the unique British Sausage. 14% of the sausage by weight is dry 'Rusk' ingredient in my Dad's Award Finalist British Sausage recipe.

The 'Rusk' absorbes the pork fats that melt when cooking, keeping the taste inside the sausage. The pork fat is what makes a Pork Sausage - try a comparison with so called 'lean' sausages. I think most will prefer the improved taste of the one with pork fat. My Dad used 25% Pork Fat to 75% Lean pork meat, and this made up 65% of the total sausage weight.

Water is added to the rusk (20%) and after the Rusk absorbes this and swells in size it is throughly mixed and the Seasoning added. My Dad did not bother fiddling around miixing different spices, herbs and seasonings, together with some preservatives to give longer shelf life. He found a supplier (LUCAS) that produced the right combination giving him the taste (fairly mild spice/herb), he was after.


For this recipe I changed things just a tad, cause what cook doesn't, and used the following:

  • 5lbs good quality pork shoulder, not trimmed of fat
  • 1 1/2 cups plain faux-rusk (bread crumbs)
  • 1 1/4 chicken stock
  • 40 grams salt
  • 10 grams black pepper
  • 10 grams nutmeg
  • A small handful fresh sage
  • 10 grams smokey chile powder


The piggie gets ground, the rest of the ingredients added and mixed, then a quick taste test. Take a very small pattie, about the size of a marble, and quickly cook it. If it tastes good, stuff into 35 millimeter hog casings. I used these casings which were incredibly easy, this stuffer, a Kitchen Aid meat grinder attachment, and the book Charcuterie. All in all, it was a terrific success, and more pics of them after they are cooked will be added.


Sunday, October 4, 2009

Chanterelle Hunting at Kentucky Falls

There aren't pictures of any of the chanterelles that we picked (between the four of us we found maybe two or three dozen), but I thought some of these pics were quite nice. Our share, a little over a dozen, will be quickly sauteed then used as a topping on some home made pizzas--clam and chanterelle, basil/mushroom/chanterelle/tomato, and probably corn/cream/chanterelle as well.

It was great weather for picking, and hopefully in a week or two the harvest will be even better.


Creative Commons License
Cheese A Day by Jeremy Pickett is licensed under a Creative Commons Attribution-Noncommercial 3.0 United States License.
Based on a work at cheeseaday.blogspot.com.